Table of Contents (Click any Topic to view first)
- Understanding Java Virtual Machine (JVM)
- JDK vs. JRE vs. JVM
- Differences between JDK, JRE, and JVM (Tabular Form)
- Setting Up Your Java Environment
- Download the JDK
- Install the JDK
- Set Up Environment Variables
- Verify the Installation
- Install an IDE
- Create a Sample Program
.png)
Introduction:
Java Virtual Machine (JVM) serves as the cornerstone of Java's platform independence, enabling Java programs to run on any device or operating system with a consistent behavior. Understanding JVM architecture is crucial for Java developers to optimize performance, troubleshoot issues, and harness the full potential of the Java ecosystem.
1. Overview of JVM:
- JVM is an abstract computing machine that executes Java bytecode.
- It acts as an intermediary between Java programs and the underlying hardware.
- JVM provides platform independence by abstracting hardwarespecific details.
2. Components of JVM:
a. Class Loader:
- Responsible for loading class files into memory.
- Three types: Bootstrap, Extension, and Application class loaders.
b. Runtime Data Areas:
- Method Area: Stores class metadata, static fields, and constants.
- Heap: Memory for storing objects and their instance variables.
- Java Stack: Stores method invocations and local variables.
- PC Register: Holds the address of the currently executing instruction.
- Native Method Stack: Stores native method invocations.
3. Execution Engine:
- Converts bytecode instructions into machine code.
- Two main components: Interpreter and JustInTime (JIT) Compiler.
- Interpreter: Executes bytecode line by line.
- JIT Compiler: Compiles frequently executed bytecode into native machine code for faster execution.
4. Garbage Collection:
- Manages memory by reclaiming unused objects.
- Different algorithms: MarkSweep, Copying, and Generational.
- Ensures memory efficiency and prevents memory leaks.
5. Native Method Interface (JNI):
- Allows Java code to interact with native libraries written in C/C++.
- Enables platformspecific functionality and system integration.
6. Monitoring and Management:
- JVM provides tools like JConsole, VisualVM, and JVM Profiler for monitoring performance metrics, memory usage, and thread behavior.
- Garbage Collection logs and memory dumps aid in troubleshooting memoryrelated issues.
7. Class File Structure:
- JVM executes programs stored in bytecode format (.class files).
- Class files consist of a constant pool, fields, methods, and attributes.
- Bytecode instructions are platform independent and optimized for execution by the JVM.
Conclusion:
Understanding JVM architecture is essential for Java developers to build robust, efficient, and portable applications. By grasping the inner workings of JVM components like class loading, memory management, and bytecode execution, developers can optimize performance, diagnose problems, and leverage the full power of Java's platform independence.
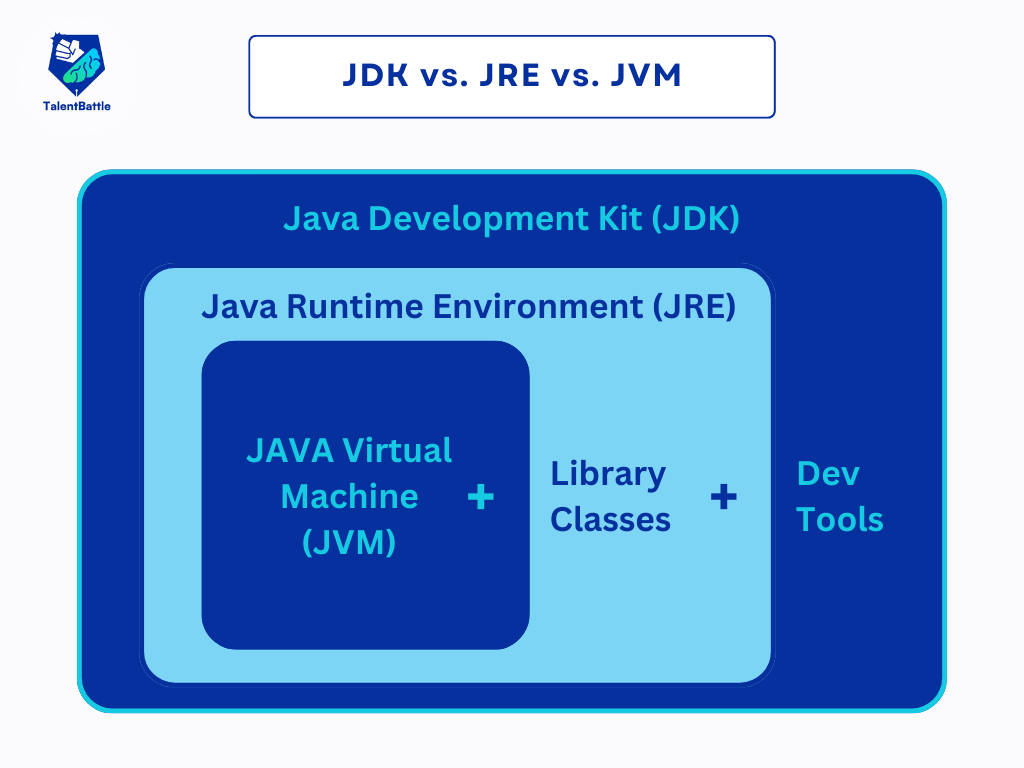
JDK, JRE, and JVM are interconnected components used in Java programming:
1. JDK (Java Development Kit):
- Purpose: Used by developers to create Java applications.
- Contents: Includes tools like compilers and debuggers, as well as the JRE.
- Platform Dependency: Specific to operating systems (Windows, Mac, Unix).
2. JRE (Java Runtime Environment):
- Purpose: Provides the environment for running Java programs.
- Contents: Includes the JVM and Java class libraries.
- Platform Dependency: Specific to operating systems.
- Usage: Can be installed separately to run Java programs without development tools.
3. JVM (Java Virtual Machine):
- Purpose: Runs Java bytecode (compiled Java programs).
- Nature: It’s a specification, meaning it describes what a JVM should do.
- Implementation: Actual programs that follow the JVM specification.
- Platform Independence: JVM itself is platform-independent, but implementations are platform-specific.
|
Feature
|
JDK
|
JRE
|
JVM
|
|
Definition
|
A toolkit for developing Java applications. Includes JRE and development tools.
|
Software package that provides the libraries and JVM needed to run Java applications.
|
An abstract machine that provides a runtime environment to execute Java bytecode.
|
|
Primary Function
|
Used for developing Java applications.
|
Creates an environment to run Java programs.
|
Converts Java bytecode into machine code for execution.
|
|
Platform Dependency
|
Platform-dependent (different versions for Windows, Mac, Unix).
|
Platform-dependent.
|
Platform-independent (specification, but implementations are platform-specific).
|
|
Tools Included
|
Contains development tools like compilers and debuggers.
|
Does not include development tools; contains libraries and JVM.
|
Does not include tools; focuses on running bytecode.
|
|
Components
|
JDK = JRE + development tools.
|
JRE = JVM + libraries to run applications.
|
JVM = runtime environment for executing Java bytecode.
|
Summary:
- JDK: For developers, includes everything needed to develop Java programs.
- JRE: For users, includes everything needed to run Java programs.
- JVM: The engine that runs Java bytecode, providing a runtime environment.
Setting up your Java environment is the first step towards developing Java applications. This guide will walk you through the process of installing the Java Development Kit (JDK) and configuring your system for Java development.
1. Download the JDK
The JDK (Java Development Kit) is essential for developing Java applications. It includes the JRE (Java Runtime Environment), compilers, and various tools necessary for Java development.
2. Install the JDK
After downloading, run the installer. Follow these general steps:
- Windows: Double-click the .exe file and follow the prompts.
- macOS: Open the downloaded .dmg file and drag the JDK icon to the Applications folder.
- Linux: Extract the downloaded tarball and move it to an appropriate directory, typically /usr/local or /opt.
3. Set Up Environment Variables
Setting up environment variables ensures your system can locate the JDK components.
Windows:
- Open the System Properties dialog (Win + Pause/Break or right-click on My Computer and select Properties).
- Click on "Advanced system settings" and then on "Environment Variables."
- Under "System variables," click "New" to create a new variable:
- Variable name: JAVA_HOME
- Variable value: Path to your JDK installation (e.g., C:\Program Files\Java\jdk-15.0.1).
- Find the Path variable, click Edit, and add %JAVA_HOME%\bin to the list.
macOS and Linux:
- Open a terminal.
- Edit your profile file (~/.bashrc, ~/.bash_profile, ~/.zshrc, etc.) with a text editor.
- Add the following lines:
bash
export JAVA_HOME=/path/to/your/jdk
export PATH=$JAVA_HOME/bin:$PATH
- Save the file and run source ~/.bashrc (or the appropriate profile file) to apply the changes.
4. Verify the Installation
To confirm the installation is successful, open a command prompt or terminal and type the following commands:
java -version
You should see output indicating the installed Java version.
javac -version
This should display the version of the Java compiler.
5. Install an IDE
While you can write Java code in any text editor, using an Integrated Development Environment (IDE) makes development easier with features like syntax highlighting, code completion, and debugging tools.
Popular Java IDEs include:
- IntelliJ IDEA
- Eclipse
- NetBeans
Download and install your preferred IDE from its official website, and follow the setup instructions.
6. Create a Sample Program
To ensure everything is set up correctly, create a simple Java program. Open your IDE and create a new Java project. Add a new Java class with the following code:
public class HelloWorld {
public static void main(String[] args) {
System.out.println("Hello, World!");
}
}
Run the program. If you see "Hello, World!" printed on the console, your Java environment is correctly set up!
By following these steps, you'll have a fully configured Java development environment ready for coding. This setup ensures you have the necessary tools and configurations to begin your journey into Java programming. Happy coding!